Introduction
This article is part of a series on integrations between Power BI and Power Apps.
Part 1 of the series showed how to get started with creating and embedding a basic Power App in a Power BI report for data write-back. Find the article here: Link to Part 1!
Part 2, taught you how to choose an appropriate Data Source for your Writeback needs, and how to display the data live in Power BI with a DirectQuery connection. Find the article here: Link to Part 2!
In this Part 3 of the series, I’ll teach you a few quick tips & tricks for layouting your embedded Power Apps in Power BI, and overcome the limitations of the Phone Layout that is forced upon Power Apps created from Power BI.
In short, this article will teach you:
- How to change the sizing dimensions of Power Apps with Phone Layouts.
- How to identify the right sizing dimensions for your embedded Power App
1. Manipulating the size of the canvas in Power Apps made for Phone Layout
If you have followed the first Parts of this Article Series, or have on your own tried creating a new Power App from within the Power Apps for Power BI visualization type in Power BI (which is necessary to enable the PowerBIIntegration.Refresh() function described in Part 2), you will inevitably realize that your Power App will not have dimension properties available in the Power App settings. Rather, you will only be able to choose between ‘Portrait’ or ‘Landscape’ orientation…:

… as opposed to the full dimension settings of a Power App with Tablet Layout:

The inability to alter the sizing of the app may result in the dreaded “grey borders” that often haunt the design of Power Apps embedded in Power BI reports:

However, there is a workaround. instead of resizing your Power App from within the App Settings, you may simply change the Height and Width properties of your Screens in the Power App, to whatever fits your needs.
Before:

After changing the Screen Height and Width:

A bit of rearranging, and we’re left with a Power App much better fitting the dimensions of our visualisation in Power BI:

You should however use this feature with caution, as it may produce unexpected end-user experiences. You want to ensure that all of your screens are sized equally, and you want to make sure the Power App is only used in a setting where the chosen sizing makes sense.
2. Identifying the proper sizing dimensions of your embedded Power Apps
But what size should you then choose for your Screen Height and Width?
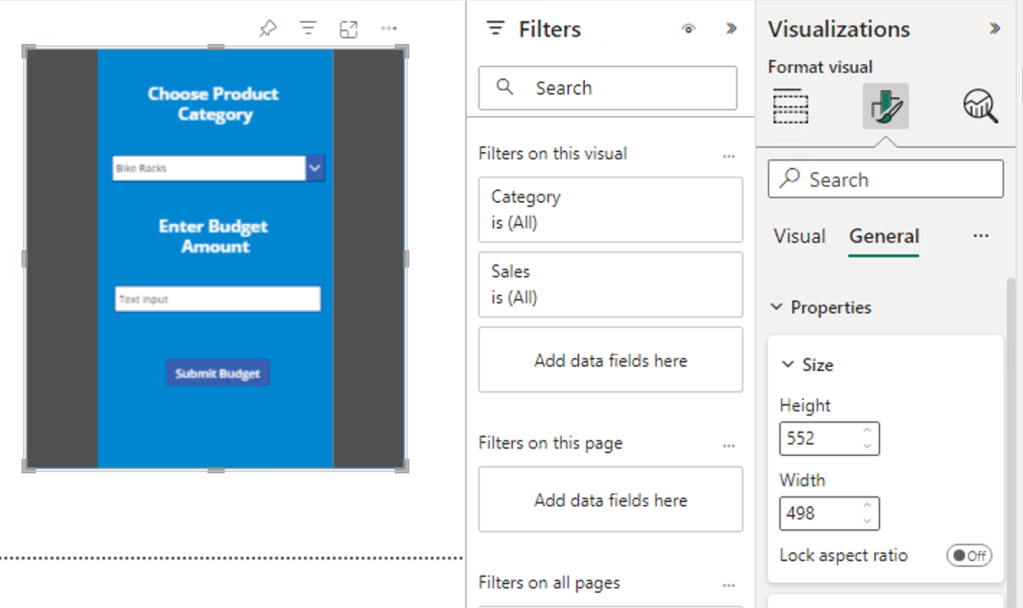
Trial and error can be cumbersome, and another tip in terms of identifying the correct Height and Width dimensions, is to open your Power BI report, and resize the Power Apps for Power BI visualisation to your required size. Within the formatting options of the visualization, make note of the height and width dimensions. Use these dimensions as the size dimensions inside of your Power App as well, to make the Power App fit snugly within the frame in Power BI.

My personal experience, is that everything inside embedded Power Apps often appear slightly too large. If you experience this too, a bonus tip is to scale up the dimensions of the Power Apps size dimensions to make everything appear smaller, without having to resize each individual element. Just make sure to keep the correct height to width ratio as you are adjusting (e.g. to make elements in your 1000×500 Power App appear smaller, try adjusting the size of the App to 1200*600 within Power Apps).
Here i made small adjustments to make the content appear slightly smaller:

Summary
Power Apps created from within Power BI will always be in Phone Layout. Use the Screen.Width and Screen.Height properties in your Power App to manually alter the Height and Width of your Power App screens. For sizing guidance, use the dimensions of the Power Apps visualization in Power BI, to get a starting point.


Leave a reply to Advanced Filter/Parameter passing from Power BI to Power Apps – Downhill Data Cancel reply