Introduction
If you have tried setting up alerts in the Power BI Service, you have most likely encountered a couple of annoying limitations:
- Alerts can only be setup on Dashboard Tiles, not on Reports or Apps
- Alerts can only be setup on KPI, Card and Gauge visualisations
- Metrics are not super flexible
Data Activator in Fabric works pretty great, but is best done on streaming data and requires a Fabric Capacity to use. So what do you do, if you are working with Power BI, and want this functionality without a capacity?
You employ Power Automate to assist you!
This guide will teach you how to send data alerts driven to your users, based on monitoring your Power BI datasets with Power Automate. This will work on any column in your dataset, and hence, is not limited to any kind of visualization. Further, the Power Automate calculations are based on DAX, meaning that you can apply any filtering, aggregation or date/time logic needed to set up your Alert as needed.
Loading your Power BI Dataset into Power Automate
The way to set it up is as follows:
1.Create a new Power Automate flow, using any kind of trigger. I am using a Scheduled trigger, so that I can run my flow for Data Driven alerts every morning, before my team gets it to work, but after the Power BI dataset has updated overnight.

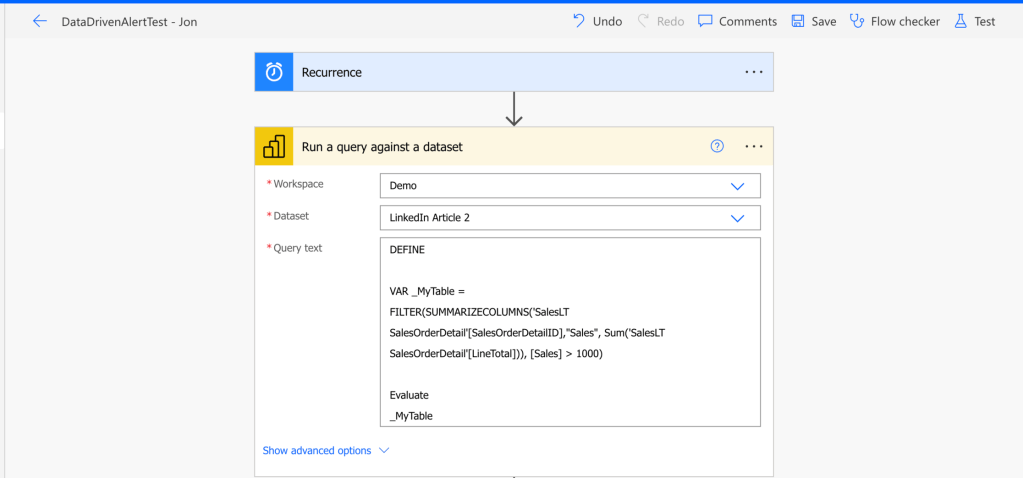
2. Add a new step to “Run a query against a dataset” for Power BI.
This is where the magic happens. Use the GUI to select your Workspace and Dataset, and then you need to define your query.
The Query needs to be written in DAX, using much the same Syntax as you might have seen in External Tools like DAX Studio.
Your Query needs to follow the following simple rules:
- Use the keyword “DEFINE” to start your query
- Use the keyword “VAR” to define variables
- Use the keyword “EVALUATE” to determine which data to return to the flow from the query
In my example here, I am using SUMMARIZECOLUMNS() along with defining a SUM Column, wrapped in a FILTER() function, to look for rows exceeding a Threshold value of 1000.

3. Test your flow to see if you get the expected outcome. I am indeed here receiving only SalesOrders with a LineTotal exceeding 1000.

Create your Alerts in Power Automate
4. With the Filtered Data which is falling out on our Filter Threshold loaded into Power Automate, the next step is to give us the ability to format and work with this output data. To do so, go ahead and copy the Output of the step shown above.
Insert a “Parse JSON” operation, and select “First Table Rows” as the dynamic content to parse, and then click the “Generate From Sample”, and parse in the output you copied, to automatically generate the schema for parsing the JSON query.

5. Another good idea at this point, is to use a ‘Select’ operation to choose and rename the Columns which you’d like to use for further analysis and reporting. This is especially useful if you used a lot of columns in your DAX statement, but do not need all of them further downstream.
To set up this step, simply add the dynamic content from the Parse JSON operation as seen below:

6. Next, I do a small Compose action, in order to count the number of rows present in my current data table.


The syntax of this, is as seen:
length(body('Select'))
7. This Row Count is then used in a Condition Control, as I only wish to send an Alert if there are any Rows that matches my query.

8. For the “No” result, I’m not defining any further actions, but for the “Yes” result, I’m formatting the data table as an HTML table, using the output of the Select action.
In this case, I’m not formatting this HTML table, but you could apply custom CSS to style the HTML table created here, to prettify the end result.

9. Lastly, i’m putting an Email action, to send an Email with the HTML table to a designated person:

10. And test-running the flow gives the following result by email:

Use Case Ideas for further expanding functionality
Alerts sent to dynamic receivers
While the above example sends an alert to a hard coded recipient, you could easily alter the flow to allow multiple dynamic recipients. You could either do conditional logic within the flow, to manipulate who the Email action sends an email to.
But, you could also, in cases where you have a data field in Power BI with a recipient name (e.g. a Product Owner, a Sales Rep. or similar), include that field in your Power BI query, parse it out, and loop through the data rows returned, and send specific rows of data to their respective owners.
Store alerts in a database for future analysis
The above example simply sends the alert to an email address, and the alert is then only saved and stored there.
If you want to keep records of the alerts sent out, and potentially do analysis on historic trends on alerts, look for patterns or frequent triggers, you could consider adding a step in your Automate flow to save the Query Results and the trigger information in a Data Source of your choice. SQL Server, Sharepoint Lists and Dataverse might all be suitable results.
Use “Run a query against a dataset” to export data from your data model
You may also simply use the functionality to export data to a data source of your choice. Usually, your Power BI reports only allow exporting data to CSV/Excel/PDF. But, using the methodology above, we can also simply save snapshots of data into your preferred data source, for use in other tools.
You could in this case even alter the trigger of the flow to become a Manual Button presented to the end users, inside your Power BI report, to allow manual data export.
And to make things even more impressive, you can even allow this Manual trigger to take any filters applied inside the Power BI report into account, when running the flow.
Summary
You can leverage the Power of Power Automate to overcome the annoying Data Alert limitations of the Power BI Service, and create alerts for any data column in your Data Model.
Simply use your DAX knowledge in the “Run a query against a dataset” in Power Automate to return any subset of data you desire, and use it to store data in data sources of your choice, and send email notifications and teams reminders to users.


Leave a reply to Link Collection: Enhancing Microsoft Fabric with Microsoft Power Platform – Downhill Data Cancel reply