Introduction
Dataflows Gen2 are frequently (and often rightfully so) bashed for their performance inefficiencies. Especially in comparison with other ingestion and transformation tools in Fabric (Notebooks, Pipelines, Copy Jobs, SPROCs).
The fact remains however, that in the hands of a self-service developer, they are an incredibly powerful tool – if you can spare the compute on your capacity.
In this article, I will highlight tips and tricks to make the most of working with Dataflow Gen2 in Fabric. The list is by no means exhaustive, but simply consists of a bunch of tips which I found useful in the past year, including new and overlooked features, as well as old best practices:
- Introduction
- Bulk / Default Data Destinations (Update)
- Data Types & Data Destinations
- Sharepoint Data Destinations
- Optimizing Sharepoint reads with Sharepoint.Contents
- Query Folding
- Fast Copy and Data Staging
- More on Dataflow Staging
- Incremental Refresh
- GIT, Deployment Pipeline & Public API Supported Dataflows
- Closing Remarks
Bulk / Default Data Destinations (Update)
Back in November, I shared a method for adding Default Data Destinations to your Dataflow Gen2, which was interesting, because there was no way to bulk-add data destinations for your queries.
At that time, you could only do so by creating your Dataflow item from inside the storage item you wanted to be your default data destination. You can still do this, and to this day, it is still the only way to ensure that new queries created in your Dataflow automatically maps to the same destination every time.
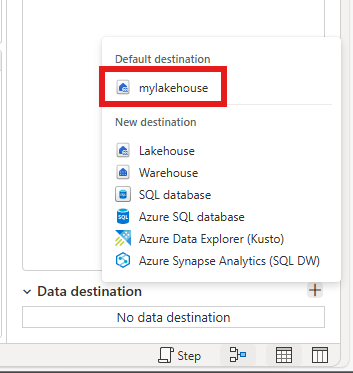
However, a new method to bulk add a data destination to multiple queries at once has finally been added. You can simply refer to three different buttons inside the Dataflow Gen2 UI for setting up default destinations, as also mentioned in the official docs (Dataflow Gen2 default destination – Microsoft Fabric | Microsoft Learn):
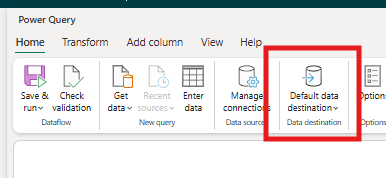

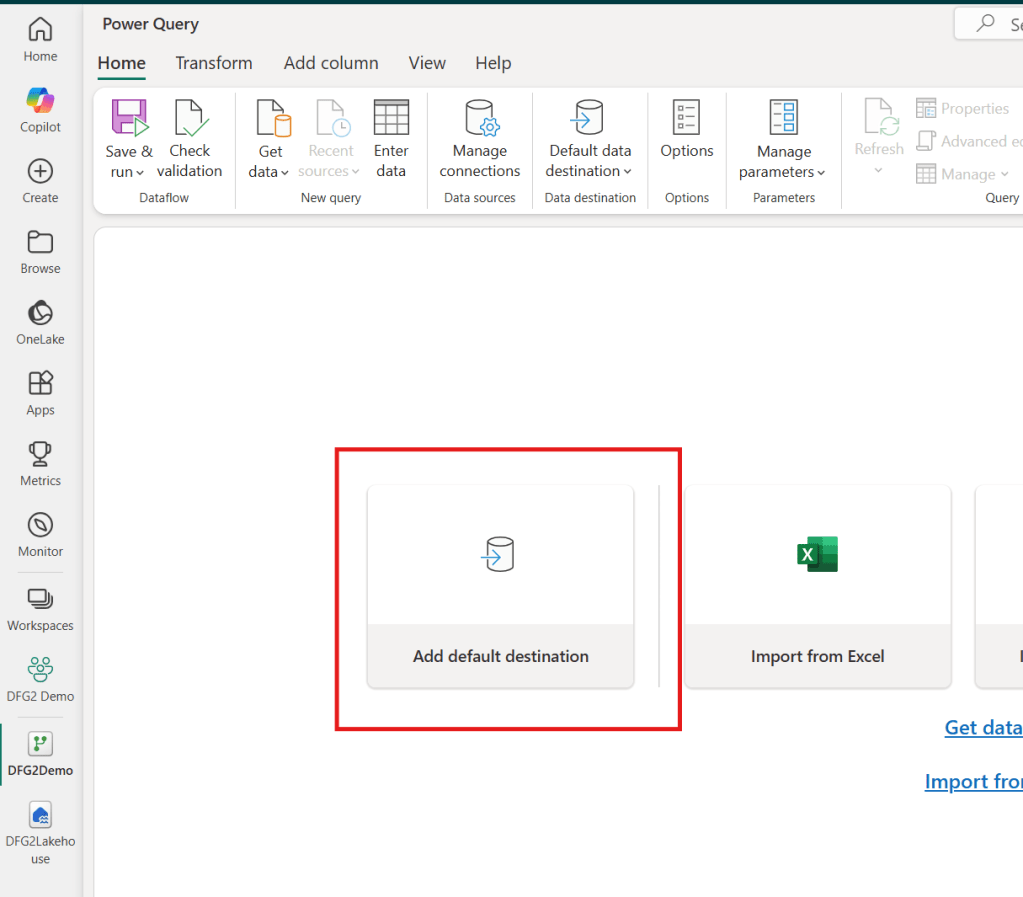
Selecting any of these will let you point to a storage item, and select which queries to bind to said destination.
In addition, it is incredibly quick to later add the same destination to additional queries you create later. But note the difference! As opposed to the Default Destination created through the first method which is automatically assigned to all queries in your dataflow, you need to manually map new queries with this technique:
Data Types & Data Destinations
When using data destinations for Dataflow Gen2, it is very important to be aware of supported Data Types in the destination as they may vary, and you may be surprised to learn that Lakehouses and Warehouses especially have several unsupported data types:

One especially devious data type “gotcha” moment, is that nullable columns in the Dataflow may in some cases be defined as non-nullable in the destination during setup. When null data then is attempted inserted, it throws an error.
While this error appears seemingly randomly, you can avoid it by manually setting the optional “nullable” parameter in the underlying M-code, as described in the Microsoft Documentation:

Sharepoint Data Destinations
Do you want to automatically share data with users in Sharepoint? Then you’ll be happy to know that it is now possible to use a Dataflow Gen2 to output csv files to a Sharepoint Data Destination.
You simply select Sharepoint as the data destination for your query:

Add your connection details:

And choose folder and file setup:
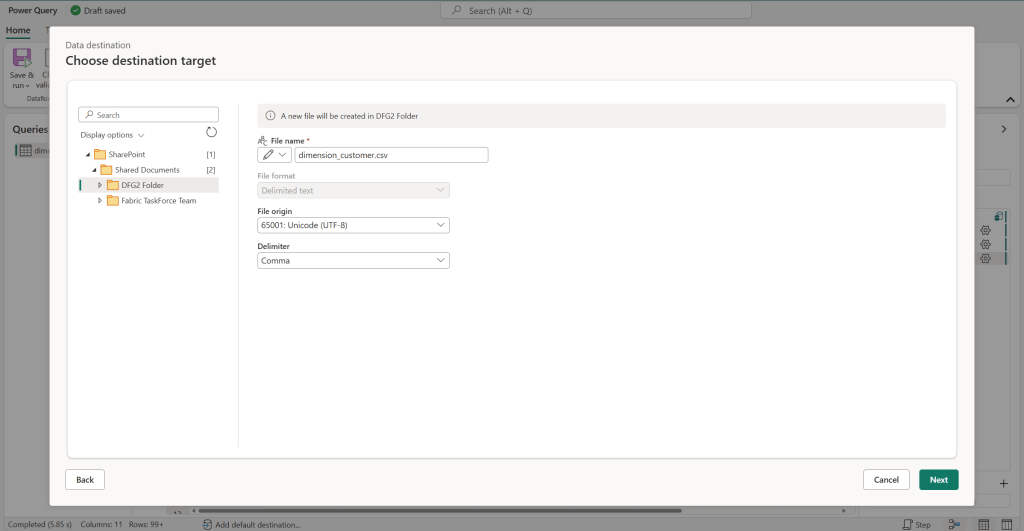
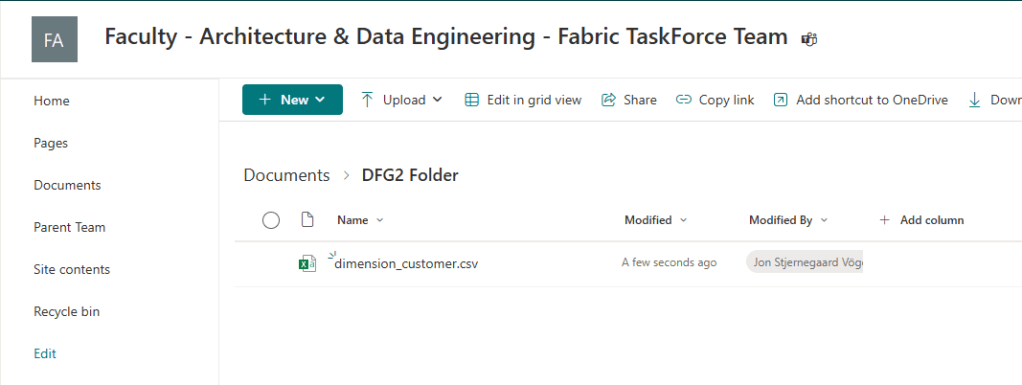
After running the flow, the CSV file appears in Sharepoint, ready for end users to consume:
Note that it is currently not possible to use Sharepoint as a Default Data Destination, nor is it possible to bulk add it as a destination to multiple queries at once. Let’s hope these limitations are lifted when the feature enters GA.
Optimizing Sharepoint reads with Sharepoint.Contents
Speaking of Sharepoint.
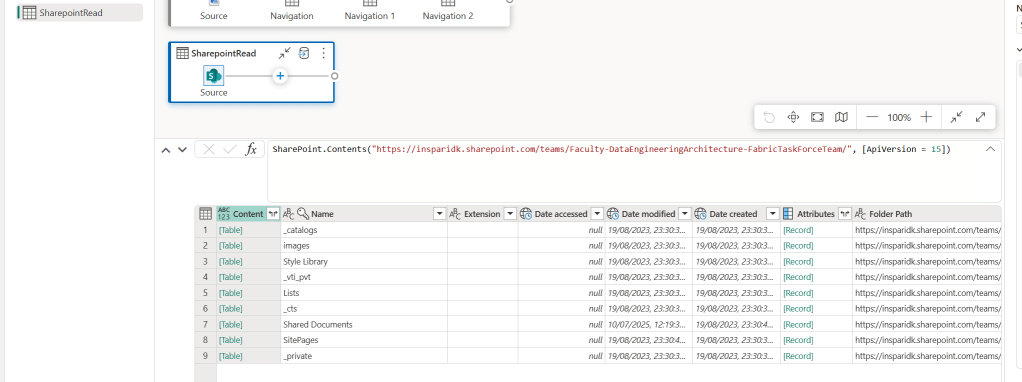
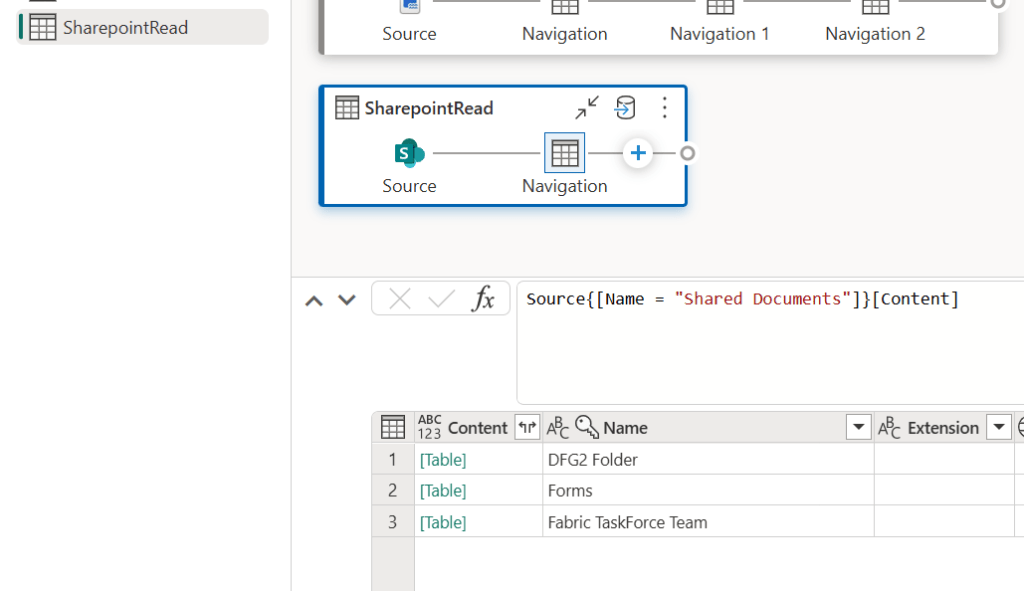
An old trick which anyone working with Dataflows (or Power Query!) needs to know, is to use Sharepoint.Contents() instead of Sharepoint.Files() to connect.
When connecting to a Sharepoint Folder with Dataflows/Power Query, the default connection uses the Sharepoint.Files() connector, which is neither efficient nor user friendly, as you are simply presented with a long list of all documents stored in the Sharepoint site.

If you alter the code to use Sharepoint.Contents() instead, you get a much cleaner experience that allows you to drill down the folder structure to find your files. It even performs much better too!
Query Folding
Query Folding is by no means a new concept, but it is still incredibly relevant for performance optimizing your Dataflows.
In brief, Query Folding is the concept of offloading compute and transformations to the data source you are connected to. This is only possible for some types of data sources, and only supported for certain types of data transformation in your Dataflow.
The topic has seen extensive writing, and I will not pretend I know any better than the excellent guides already out there, so to keep it brief here:
- Queries may fold entirely, partially or not at all – always strive towards as much folding as possible.
- To understand when your query folds and when it doesn’t, refer to the Query Folding indicators:
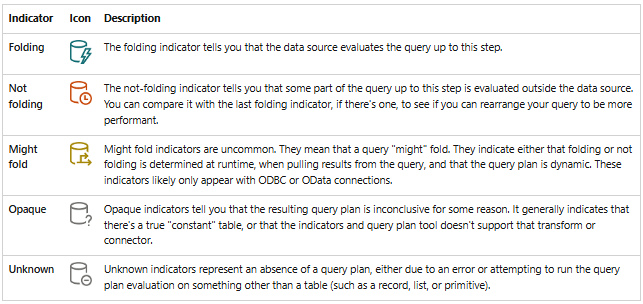
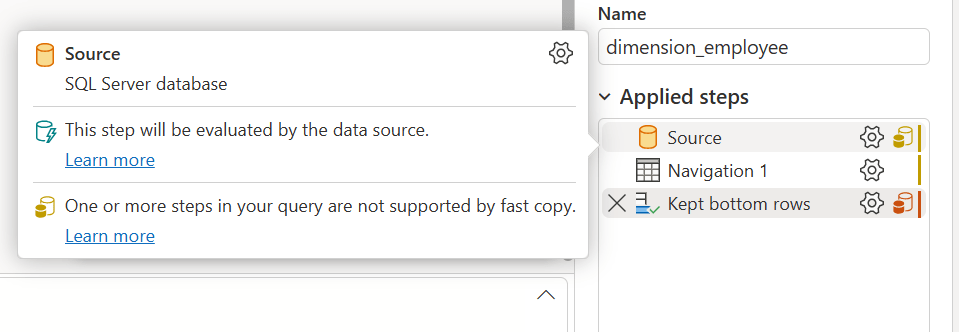
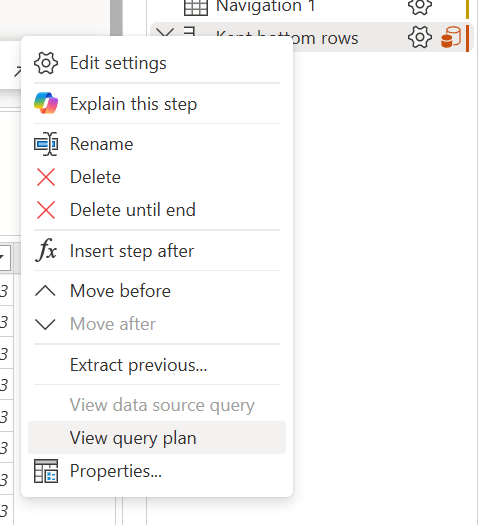
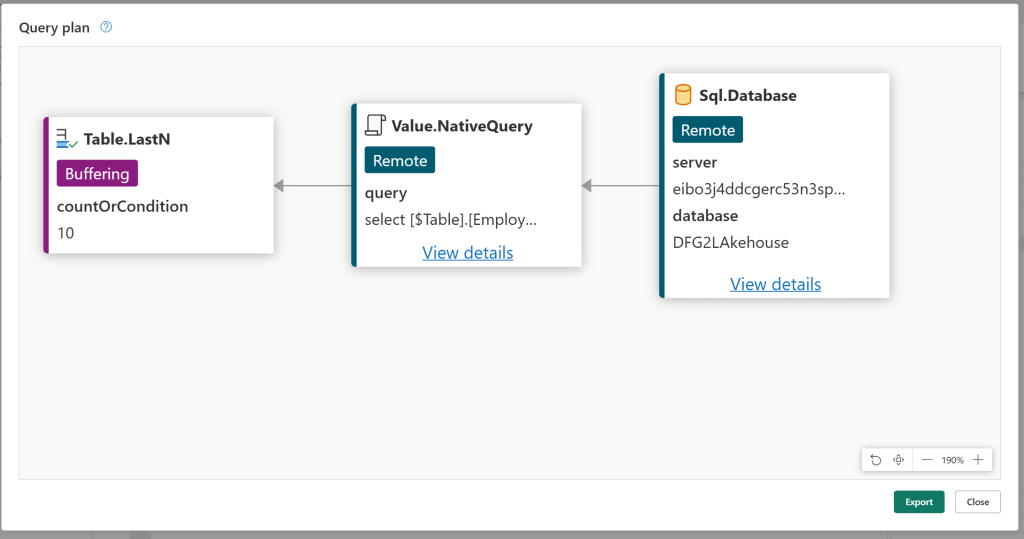
- Use the Query Plan to fully understand what is folding in your query:
Fast Copy and Data Staging
In the screenshots above you might have noticed indicators for another new performance optimization concept: Fast Copy.
Fast Copy is a feature which allows for simple ingestion operations on large amounts of data to take place with the CopyActivity engine from Data Pipelines, instead of using the Dataflow engine. This leads to a much more efficient data ingestion process.
Fast Copy only works for queries with a Lakehouse data destination, and is only allowed for queries using the following transformations:
- Combine files
- Select columns
- Change data types
- Rename a column
- Remove a column
If you need any other transformation in your query, you should split your Dataflow up into e.g. two separate queries. The first query should purely ingest data using Fast Copy and only the transformations mentioned above, and your second query should reference the first query, before applying additional transformations.
So how do I turn this on?
In order to start using Fast Copy, you must ensure the feature is enabled in your Dataflow Options:
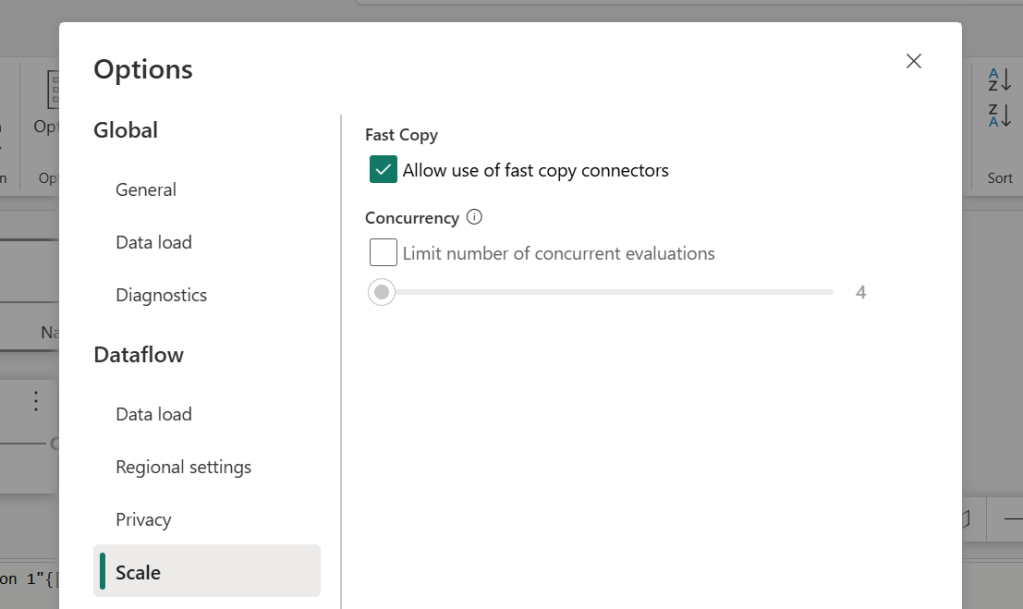
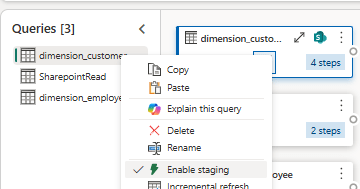
And then you need to turn on “Enable Staging”, which prescribes the Dataflow to use an intermediate “DataflowsStagingLakehouse” destination for the ingestion query, and subsequently leveraging this Lakehouse to increase the performance of subsequent queries:
After enabling both of these, Fast Copy will automatically be applied when your queries allow it, and when an undisclosed data volume threshold is reached. For small data volumes, Fast Copy will not be used by default.
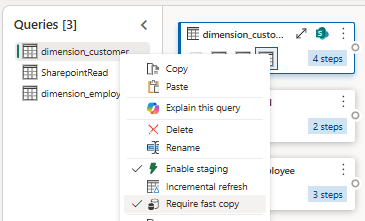
If you are not happy with this uncertainty, you can toggle “Require Fast Copy” on the right-click menu of your queries. This will consequently fail your dataflow, if you toggle this for a query which for any reason can’t be fast copied.
More on Dataflow Staging
It might be good for you to know that when staging takes place, data is stored temporarily in the “DataflowsStagingLakehouse” and “DataflowsStagingWarehouse” items in your workspace. Early Fabric adopters might remember seeing these items in the Workspace, but today they are hidden from the GUI and can only be seen through other means (anecdotally I find that they may still appear visibly in the workspace as a bug too though). You should avoid touching these items, and neither modify their contents nor add anything to them yourself – they are simply used automatically when demanded by the dataflow settings.
Speaking of these settings, confusingly, while “Enable Staging” is required for Fast Copy, you can also apply it independently for queries that don’t use Fast Copy.
Wait. Why? What does Enable Staging do if not enable Fast Copy?
“Enable Staging” is simply related to whether the query will use the “DataflowsStagingLakehouse” to output its data or not, whereas Fast Copy only relates to whether the query uses the CopyActivity engine or the Dataflows engine to do the job.
Why is it even a separate setting?
Because other query operations may too benefit from having the data staged in a Lakehouse prior to being handled, even if unrelated to the CopyActivity engine.
Why is not just always enabled then?
Because conversely, staging the data in the Lakehouse does take time as well, and for some Dataflows that time sink won’t be worth the investment.
Conclusively, you should test out for yourself whether Enable Staging will improve the performance of your flow or not.
Other great community contributors have highlighted the complexity of this, and I’ll encourage you to check out blogs from the brilliant Chris Webb (Fabric Dataflows Gen2: To stage or not to stage?) and Reitse Eskens (Microsoft Fabric Dataflow Gen2: In-depth Performance Evaluation and Capacity Insights – Reitse’s blog).
Incremental Refresh
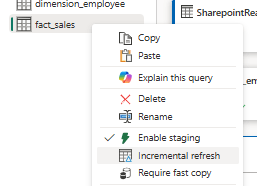
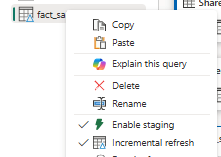
The right-click menu on your Dataflow Gen2 queries have recently seen the addition of another feature with performance enhancing potential: Incremental Refresh.
Incremental Refresh for Dataflow Gen2 has tremendous potential for reducing load times of large tables – usually transactions and fact tables. It works largely like Incremental Refresh for Semantic Models and Dataflow Gen1, with a few small changes:
- You still identify a DateTime column to use as basis for filtering
- You then define based on another DateTime column (or the same column for append-only scenarios) for which period you wish to update data for (this is slightly different from Semantic Models and Dataflow Gen1, in which you define both a “Freeze” period, an “Update” period and potentially even a “Live” period).
- And finally you optimize the Incremental Load by defining Bucket Sizes and Concurrent Evaluations
- When running, the flow then compares the Maximum DateTime value in the Source and Destination, to determine what data is new, before loading this data into the defined buckets, and Upserting data in your destination with a “Replace” method.
- Note that this also means that Dataflow Gen2 never deletes data which has previously been loaded, even if it is outside your defined incremental period: Incremental refresh in Dataflow Gen2 – Microsoft Fabric | Microsoft Learn
To be a little more specific, the step by step setup looks like the following:
- Select Incremental Refresh from the Right-click menu of your query.
- Configure the settings by defining Filtering and Change Detection columns, as well as Bucket Sizes and other settings:
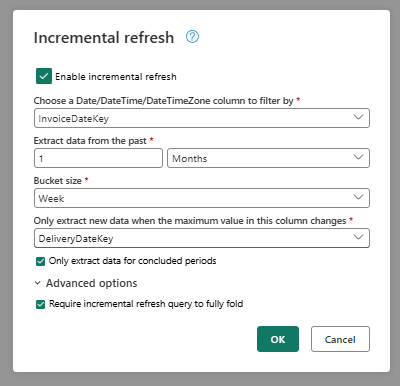
3. Verify that the Incremental Refresh “delta” symbol appears for your query, and trigger a refresh of the Dataflow to observe the behaviour and performance.
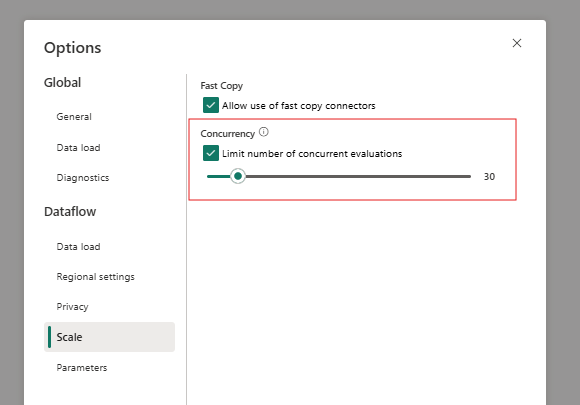
4. Optionally play around with the Bucket Sizes as well as Concurrency Settings to optimize performance.
Note that just like Enable Staging, the Incremental Refresh processing happening under the hood does consume resources. For some dataflows this might mean that the Incremental Refresh overhead is not worth the investment, and that you are better off without it.
To briefly cover limitations too:
- Word is that you should only do this for Data Sources which are enabled for Query Folding
- You can only do this for destinations with a Fixed Schema and through the “Replace” method
- You can only use Fabric Lakehouses and Warehouses, and Azure SQL Database and Azure Synapse Analytics as destinations.
In truth, Incremental Refresh deserves a whole blog post of its own to cover best practices and limitations. But I hope the above is a sufficient introduction to the topic for you to explore more on your own.
GIT, Deployment Pipeline & Public API Supported Dataflows
For along time, Dataflow Gen2 was ruled out from many Fabric Architecture drawings due to the lack of proper CI/CD support.
This is should no longer be the case, as GIT, API and Deployment Pipeline support for Dataflows Gen2 is finally here.
When you create new Dataflows in a Workspace, you are prompted for deciding whether or not to enable this. Note that this also means that any existing Dataflows you have will need to be recreated to support this feature.

Using your Dataflow Gen2 with the built-in Deployment Pipelines or GIT Integration obviously requires you to setup these features for the Workspace in which your Dataflow is stored.
And finally the Public APIs allow you to use other tools to facilitate the same CI/CD principles from e.g. Azure DevOps.
Closing Remarks
It is a shame that Dataflows receive somewhat poor press online as they can be both incredibly fun to work with (important to remember!), and depending on your data and requirements also doesn’t have to be too expensive.
I will always argue that in the right hands, Dataflows are an incredible asset which may empower your business users to do more with data themselves, and can leave your Data Engineering resources to work on other tasks instead.
I hope the above tips can add to your own arsenal of knobs and buttons to help you tune your Dataflows.
What are your favourite Dataflow Gen2 tips?


Leave a comment