Introduction
This blog has previously covered the basics of native Microsoft Fabric / Power BI write-back with Translytical Task Flows.
In my first post on the subject, we created a simple Comment/Annotation solution, allowing the user to input free text comments on Data Points directly in Power BI.
However, Translytical Task Flows do not only support Free Text as an input type for the users of your reports. All of the new & updated Power BI Slicer visuals work with Translytical Task Flows, and we can use List and Button slicers for users to add categorical data to our task flows too.
Hence, in this blog post we’ll cover and compare the following input options:
- Free Text input with Text Slicer
- Category Selection with List Slicer
- Category Selection with Button Slicer
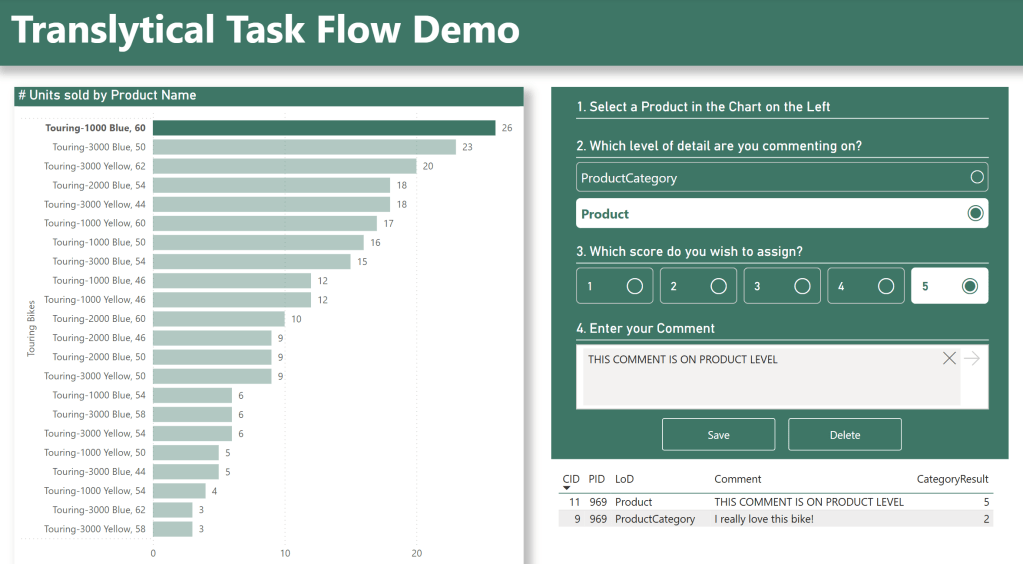
To put this into a case that is easy to understand, I’ve chosen the common Annotation requirement of having to add Comments and assign a Score to items on multiple levels of detail at the same time.
Frequently this is seen when having to add comments on e.g both a Daily and Monthly level from the same view, but in this case I’ve chosen to allow comments on ProductCategory and Products.
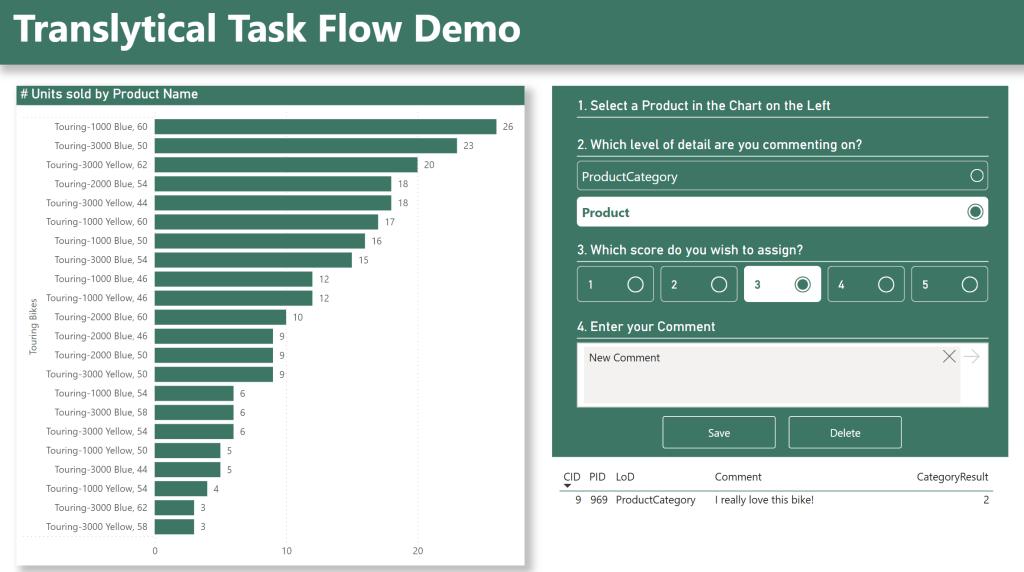
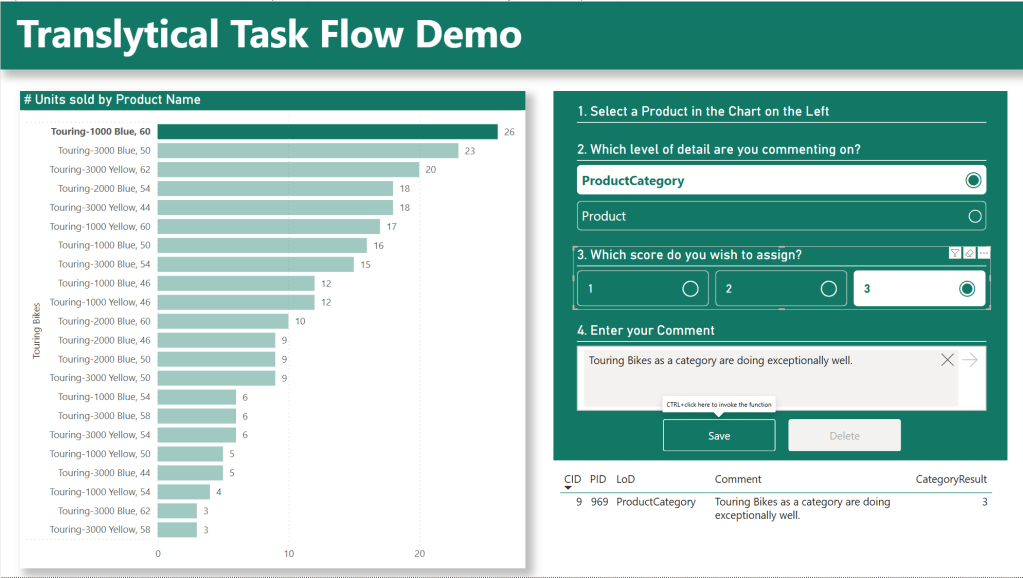
In the end, our Report will have evolved into what you see below:
Free Text Input with Text Slicer
Let’s first quickly recap the Free Text input showcased in the previous blog post.

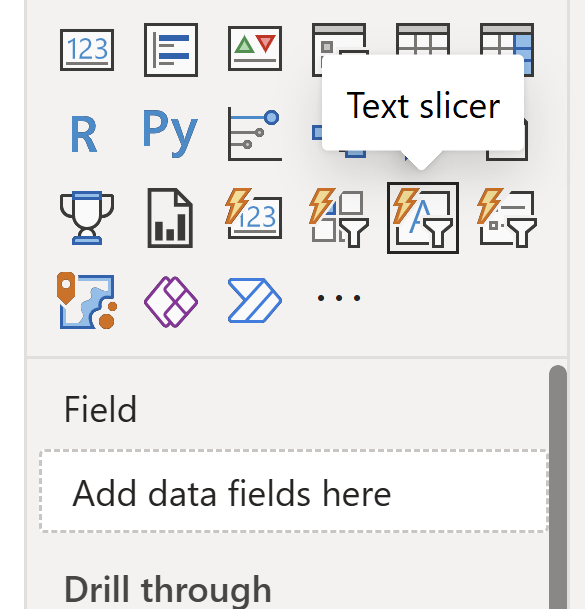
In order to provide our end users with the ability to write free text and send it to our Translytical Task Flow, we need to use the Text Slicer.
You simply add a Text Slicer to your report canvas, avoid adding any fields to the Field Well (You’ll hardly want your free text inputs to filter something on the report page), and then format it to your liking.
Formatting wise, note that currently there is no way to remove the “apply” button associated with the Text Slicer. As it is sufficient for your users to click outside of the Text Box after inputting, the button itself feels redundant (the fact that you still need to click outside the box for the TTF to recognize that the input there, is a UX catastrophe for another day…).
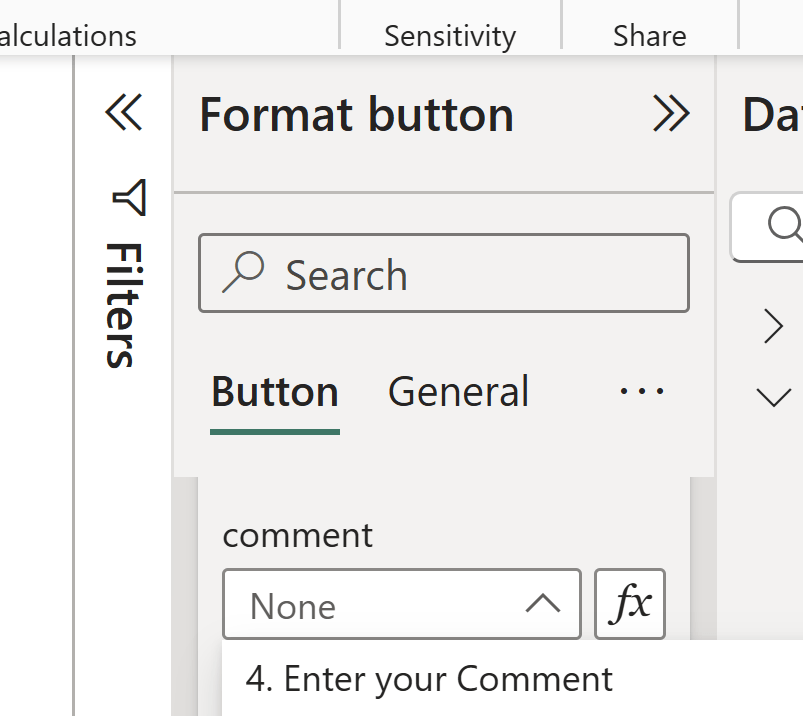
You’ll also need to consider the name that you give your Slicer, as this will also be the name by which you recognize the Slicer when setting up the TTF on the Button that runs it:
For instructions on setting up the User Data Function to add the comment, refer back to last weeks blog post: https://downhill-data.com/2025/06/03/guide-native-power-bi-write-back-in-fabric-with-translytical-task-flows-how-to-build-a-comment-annotation-solution-for-power-bi/
Category Selection with List Slicer
Now for the new stuff!
In my report, I’d like for users to be able to add comments on two levels of detail.
In this case, it will be the ProductCategory level, as well as the Product level. Another frequent use case I see for this, is comment solutions for financial statements, where users might want to add comments on Daily, Monthly, Quarterly or even Yearly basis from within the same view.
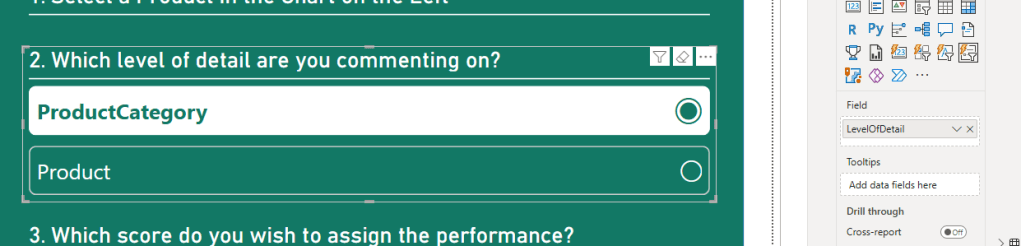
In order for us to add this feature to the report, I’d like the users to be able to choose between ProductCategory and Product, whenever they add a comment.
To do this, I use “Enter Data” to add a simple data table to my semantic model, but you could of course have used an existing dimension from your semantic model, or connected to a new table somewhere in your data estate. Note that I’ve also included a “Score” column to be used in the Button Slicer section:

My new table is added to the model, but without any relationships:

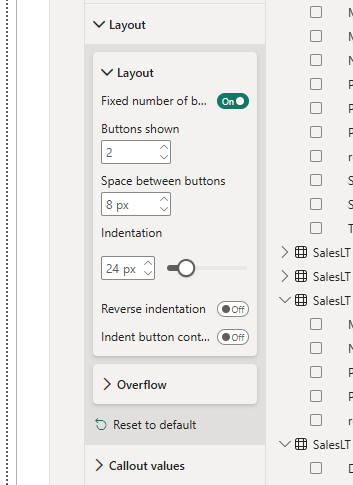
Now I can add a List Slicer to my report, add the LevelOfDetail field from my newly added table to the field well of the slicer, and apply some formatting including the layout definition seen below, to achieve a nice native-looking list like the following:
A quick note on usability here. I find that List Slicers quickly take up ALOT of real estate on your report page, as they are vertical by design, hence they work best either if you have very few options to choose from, or if you use a List Slicer that you are already actively using for filtering on your report, and not just for the comment feature.
Category Selection with Button Slicer
Now, I also want the user to assign a performance score to the ProductCategory or Product selection that they are commenting on. And not only that.
I’ve determined that these two levels of details are not scored the same way. ProductCategory is scored on a range from 1-3, and Products on a range from 1-5. In the “Enter Data” table creation shown previously, I’ve therefore added rows of data for each of these combinations.
Adding a Button Slicer to the canvas, I put the ResultScore field from the table in the Field Well, and tweak the Layout a little again to fit into the rest of theUI.
Also, in my case, I need to make sure that Edit Interactions allow my List Slicer to filter my Button Slicer. This means that depending on the user selection in step 2, the correct number of buttons are shown in step 3:


Extending our Database and User Data Function to accept more parameters
Now we need to tweak our Database and User Data Function to accept these additional user inputs.
In the database, I’ve simply added two additional columns to the Comments table (note that I changed the type of CategoryResult to INT after snapping the screenshot below):

In the same User Data Function used in the previous blog, I then go ahead and alter the function definition:

Notice how in line 29, I’ve added the string parameter “levelofdetail” and integer parameter “categoryresult”. On line 31, I also include these in the “data” object.
To make sure our UPSERT logic works, we also need to alter the Lookup and conditional Insert/Update statements.
Where we previously wanted to simply insert/update based on ProductID, I now want to check the LevelOfDetail as well:

On line 38, an extra lookup criteria is added to the SQL query, and on line 39 the levelofdetail parameter is passed to the query.
On line 43, the update query is updated with the CategoryResult and InputLevelOfDetail columns, and then importantly on line 44, the additional parameters are added. But pay attention to the order of the parameters, as they need to match the order that they are used in the SQL query!
On line 51/52, the same principle applies, but I opted for the alternative technique of using the data object defined earlier. However, you still need to make sure the order of the parameters in the data object, matches the order of the columns in the SQL query.
Finally, I also wanted to update my Delete functionality:
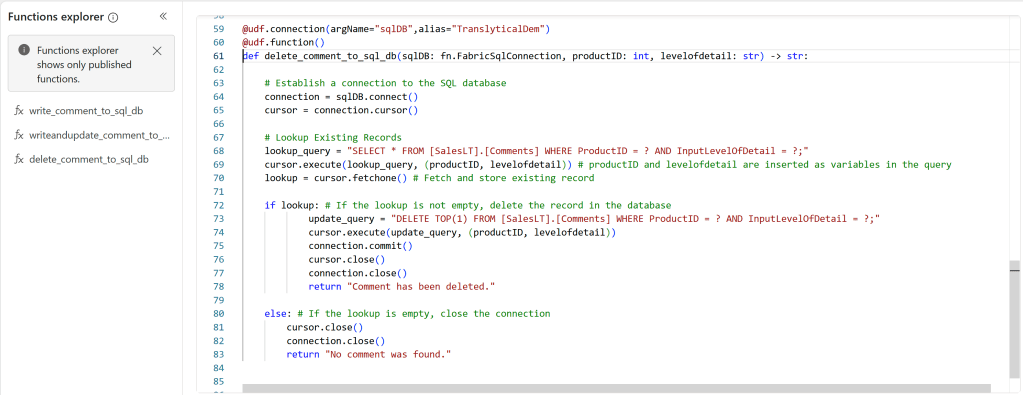
Again, this is a matter of adding the additional parameters to the definition at the top, and making sure they are reflected in your SQL queries, and the cursor.execute functions that runs them.
The full code for each of the functions are as follows:
UPSERT Function:
@udf.connection(argName="sqlDB",alias="TranslyticalDem")
@udf.function()
def writeandupdate_comment_to_sql_db(sqlDB: fn.FabricSqlConnection, productID: int, comment: str, levelofdetail: str, categoryresult: int) -> str:
    # Replace with the data you want to insert
    data = (productID, comment, levelofdetail, categoryresult)

    # Establish a connection to the SQL database
    connection = sqlDB.connect()
    cursor = connection.cursor()

    # Lookup Existing Records
    lookup_query = "SELECT * FROM [SalesLT].[Comments] WHERE ProductID = ? AND InputLevelOfDetail = ?;"
    cursor.execute(lookup_query, (productID, levelofdetail)) # productID and levelofdetail are inserted variables in the query
    lookup = cursor.fetchone() # Fetch and store existing record

    if lookup: # If the lookup is not empty, update the record in the database
            update_query = "UPDATE [SalesLT].[Comments] SET Comment = ?, CategoryResult = ? WHERE ProductID = ? AND InputLevelOfDetail = ?"
            cursor.execute(update_query, (comment, categoryresult, productID, levelofdetail))
            connection.commit()
            cursor.close()
            connection.close()
            return "Comment has been updated!"

    else: # If the lookup is empty, create a new record in the database
        insert_query = "INSERT INTO [SalesLT].[Comments] (ProductID, Comment, InputLevelOfDetail, CategoryResult) VALUES (?, ?, ?, ?);"
        cursor.execute(insert_query, data)
        connection.commit()
        cursor.close()
        connection.close()
        return "A new comment was succesfully added."
DELETE Function:
@udf.connection(argName="sqlDB",alias="TranslyticalDem")
@udf.function()
def delete_comment_to_sql_db(sqlDB: fn.FabricSqlConnection, productID: int, levelofdetail: str) -> str:

    # Establish a connection to the SQL database
    connection = sqlDB.connect()
    cursor = connection.cursor()

    # Lookup Existing Records
    lookup_query = "SELECT * FROM [SalesLT].[Comments] WHERE ProductID = ? AND InputLevelOfDetail = ?;"
    cursor.execute(lookup_query, (productID, levelofdetail)) # productID and levelofdetail are inserted as variables in the query
    lookup = cursor.fetchone() # Fetch and store existing record

    if lookup: # If the lookup is not empty, delete the record in the database
            update_query = "DELETE TOP(1) FROM [SalesLT].[Comments] WHERE ProductID = ? AND InputLevelOfDetail = ?;"
            cursor.execute(update_query, (productID, levelofdetail))
            connection.commit()
            cursor.close()
            connection.close()
            return "Comment has been deleted."

    else: # If the lookup is empty, close the connection
        cursor.close()
        connection.close()
        return "No comment was found."
Mapping the revised UDF in Power BI
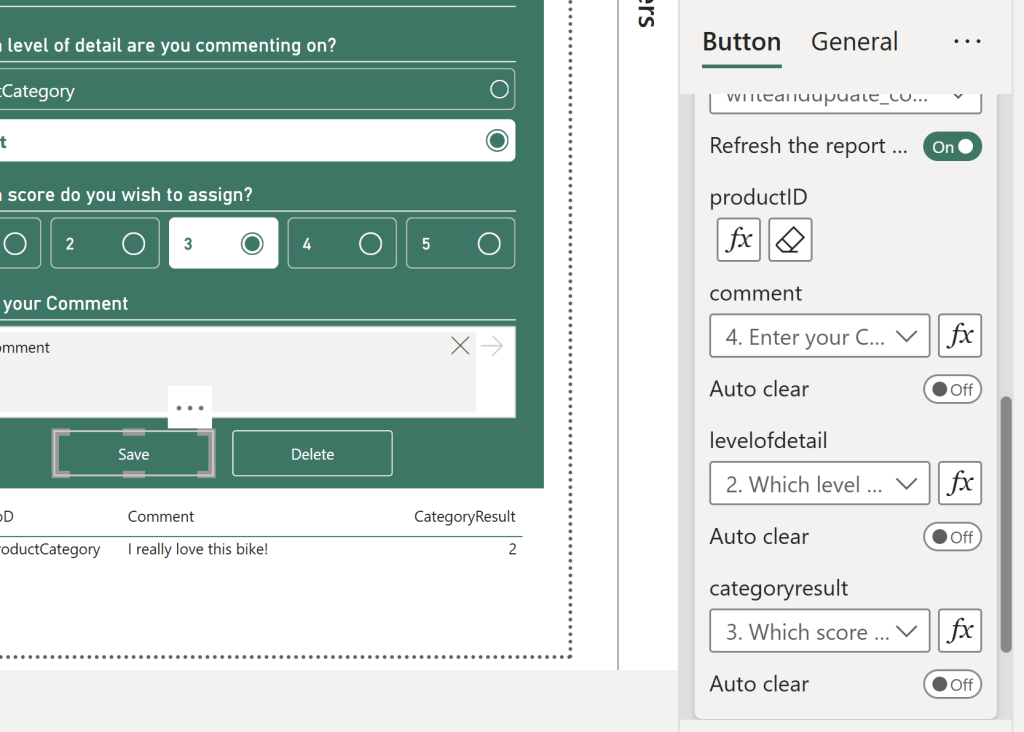
After publishing your updated UDF, it is time to update the buttons in Power BI.
If you labeled your Slicers with friendly titles, this is easy. After selecting the correct UDF from the Button Action menu, you just map each Slicer to its respective parameter.
Note that ProductID is picked up not by a slicer, but by a conditional value. In this case, simply the MAX of the ProductID column, but I could’ve used a Calculated Measure. More about this in a future blog.
For the delete button, the answer is the same:

And we now finally have a Translytical Task Flow allowing the user to input three separate parameters via List Slicer, Button Slicer and Text Slicer, to log annotations and scores on two separate levels of detail at the same time:


Leave a reply to Writeback Options in Power BI – Curated SQL Cancel reply